Jenkins Plugin
Run your Gatling Enterprise Edition simulations from your Jenkins CI.
Purpose of this plugin
This plugin enables you to start a Gatling Enterprise Edition simulation directly from your Jenkins platform. This plugin links a Jenkins job with one and only one Gatling Enterprise Edition simulation.
This plugin doesn’t create a new Gatling Enterprise Edition simulation, you have to create it using the Gatling Enterprise Edition Dashboard before.
Installation
To download the plugin, you need to get the HPI file by clicking on the following button:
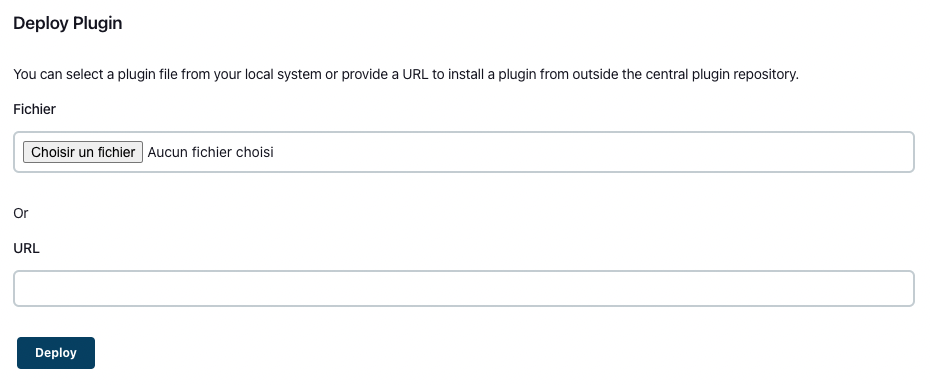
You need to be connected as an administrator of your Jenkins application to install it. Go to Manage Jenkins, Manage Plugins, Advanced settings, Deploy Plugin. Choose the hpi file you downloaded, or copy and paste the download URL to the URL field. Click Deploy.
API Token and Jenkins credentials
This plugin requires an API token to allow Jenkins to authenticate with Gatling Enterprise Edition.
The API token needs the All role.
We recommend storing the API token using Jenkins credentials. Go to Manage Jenkins, then Manage credentials. You will see your existing credentials, as well as the credentials stores and domains configured on your Jenkins instance.

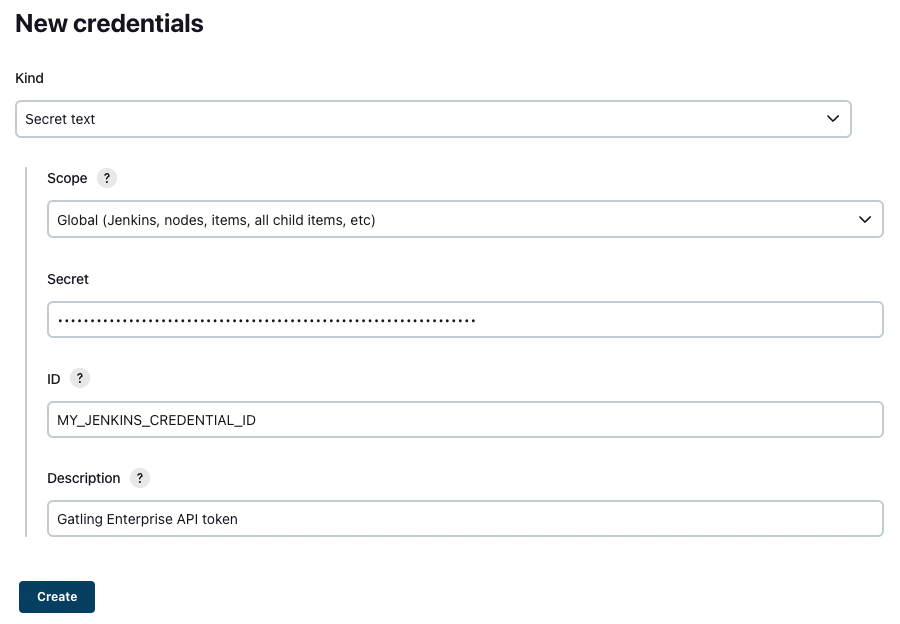
To add new credentials, click on the name of the domain you want to use, then on the Add Credentials button. Choose the type Secret text and the scope you want to restrict the credentials to, copy and paste your API token to the Secret field, and enter an ID (and optionally a description). Click on Create.
Configuration
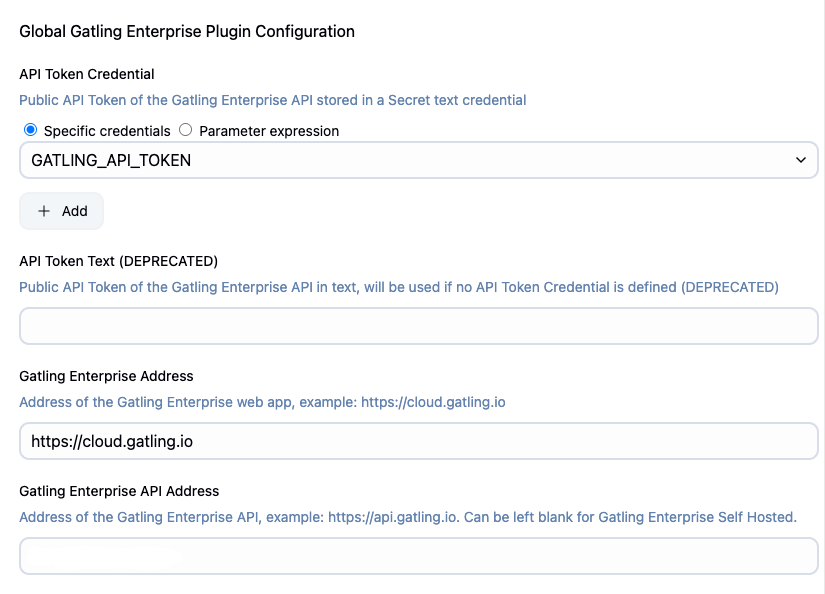
The plugin needs some global configuration. Go to Manage Jenkins, Configure System, then Global Gatling Enterprise Edition Plugin Configuration.
Choose the Jenkins credentials where you stored your API token.
The Address is the address of Gatling Enterprise Edition. The API Address should be left blank for Gatling Enterprise Edition Self-Hosted.
Job set-up
Set-up for a pipeline job (available since Jenkins 2.0)
Basics
You can use the Pipeline Snippet Generator to help you use the Jenkins Plugin. Click on the Pipeline Syntax link, then choose the step gatlingFrontLineLauncherStep.
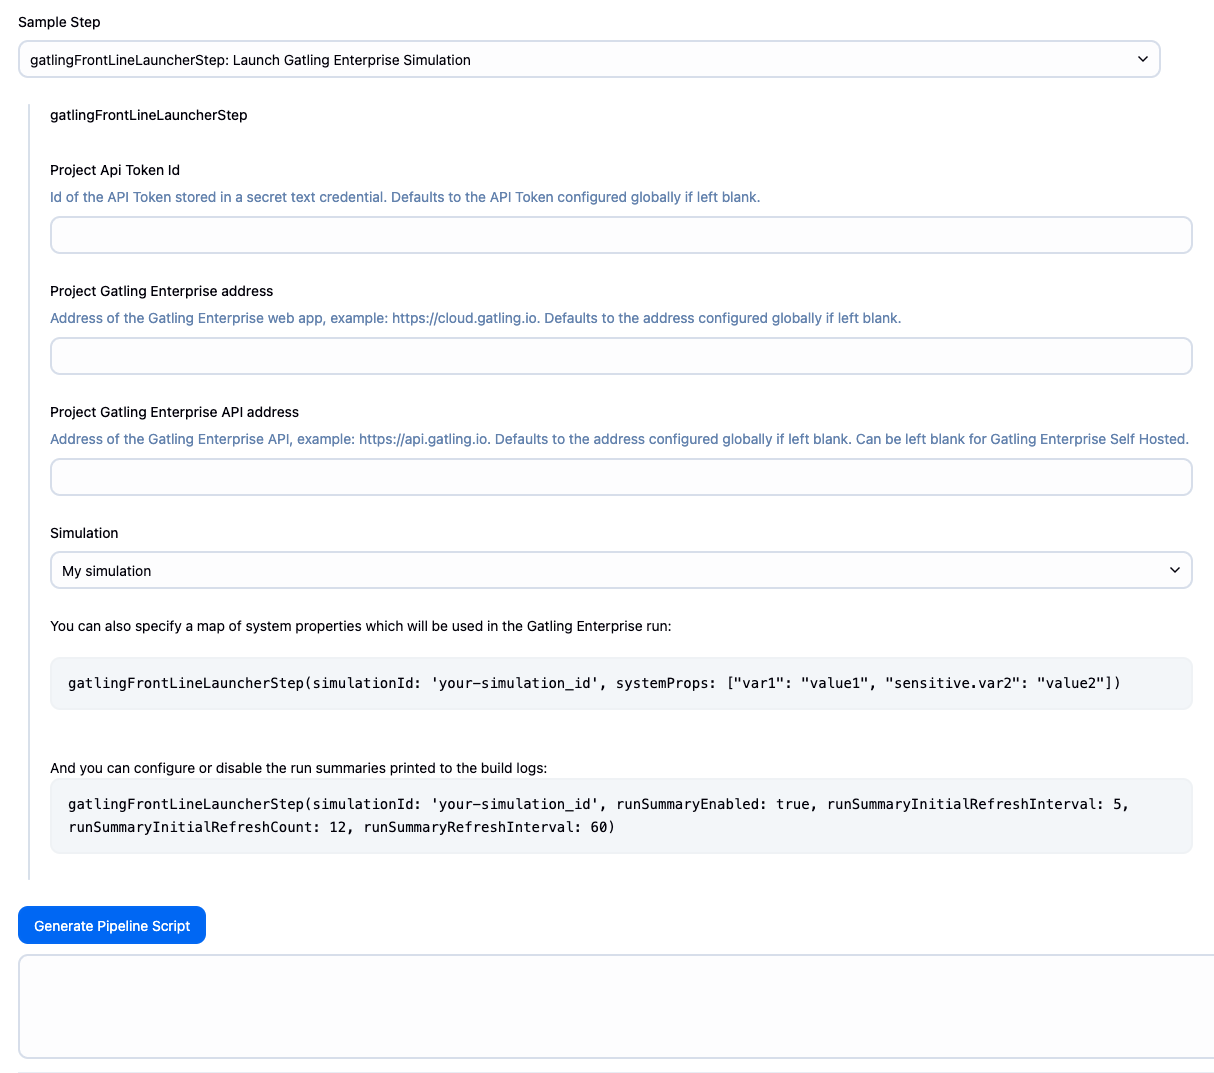
You can override the address and/or API token if needed, otherwise leave those fields blank.
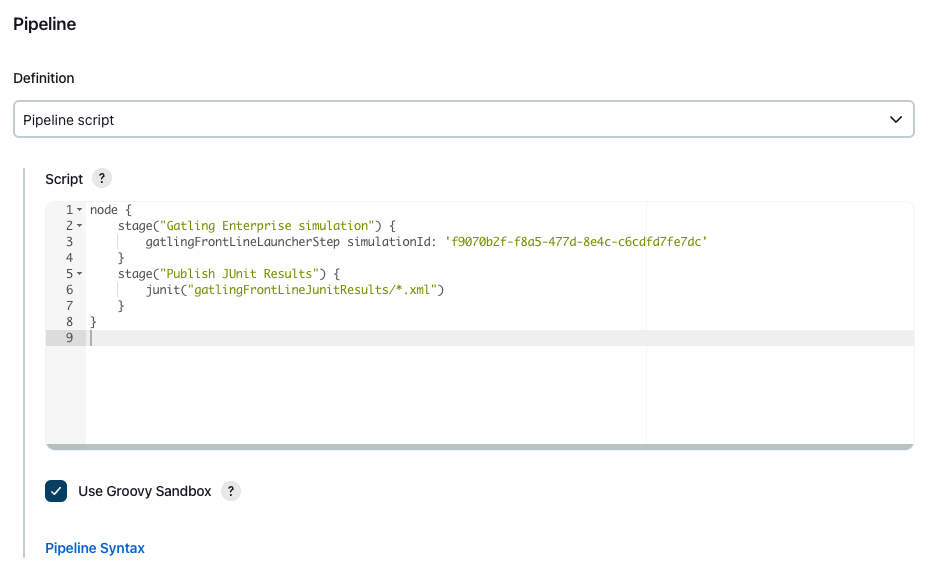
Choose one of the simulations in the drop-down menu, then click Generate Groovy. Copy and paste the result in your Pipeline script, eg:
Declarative Pipeline Syntax:
pipeline {
    agent any
    stages {
        stage("Gatling Enterprise simulation") {
            steps {
                gatlingFrontLineLauncherStep simulationId: '00eacd1c-ef91-4076-ad57-99b4c6675a9e'
            }
        }
    }
}
Scripted Pipeline Syntax:
node {
    stage("Gatling Enterprise simulation") {
        gatlingFrontLineLauncherStep simulationId: '00eacd1c-ef91-4076-ad57-99b4c6675a9e'
    }
}
Overriding the global configuration
This is especially useful when transitioning from Gatling Enterprise Edition Self-Hosted to Gatling Enterprise Edition Cloud, as you will need use the Cloud URLs and API token only for the simulations which have already been migrated; or if you have several Self-Hosted instances.
Only specifying a different credentialId can also be useful if you use API tokens with specific permissions (e.g. each restricted to one team).
If you do not want to use the globally configured URLs and API token, you can override their values for each step. For the API token, credentialId must contain the ID of a Jenkins secret text credential.
gatlingFrontLineLauncherStep(
    simulationId: '00eacd1c-ef91-4076-ad57-99b4c6675a9e',
    credentialId: 'GATLING_API_TOKEN',
    address: 'https://my-gatling-enterprise-instance.tld'
)
Passing parameters
You can specify a custom Map of system properties which will be used in the Gatling Enterprise Edition run. The syntax is the following:
gatlingFrontLineLauncherStep(
    simulationId: '00eacd1c-ef91-4076-ad57-99b4c6675a9e',
    systemProps: ["var": "$var1", "sensitive.var2": "this prop won't be displayed in the run snapshot"]
)
This step regularly prints a summary of the run’s current status to the build logs. By default, the summary is printed every 5 seconds the first 12 times (i.e. for the first 60 seconds), and then every 60 seconds. You can configure this behavior (or completely disable these logs) with the following parameters:
gatlingFrontLineLauncherStep(
    simulationId: '00eacd1c-ef91-4076-ad57-99b4c6675a9e',
    runSummaryEnabled: true,
    runSummaryInitialRefreshInterval: 5,
    runSummaryInitialRefreshCount: 12,
    runSummaryRefreshInterval: 60
)
Displaying assertions as JUnit
You can display the results of the Gatling Enterprise Edition assertions with the JUnit plugin. Add the following line:
junit("gatlingFrontLineJunitResults/*.xml")
Set-up for an old style job
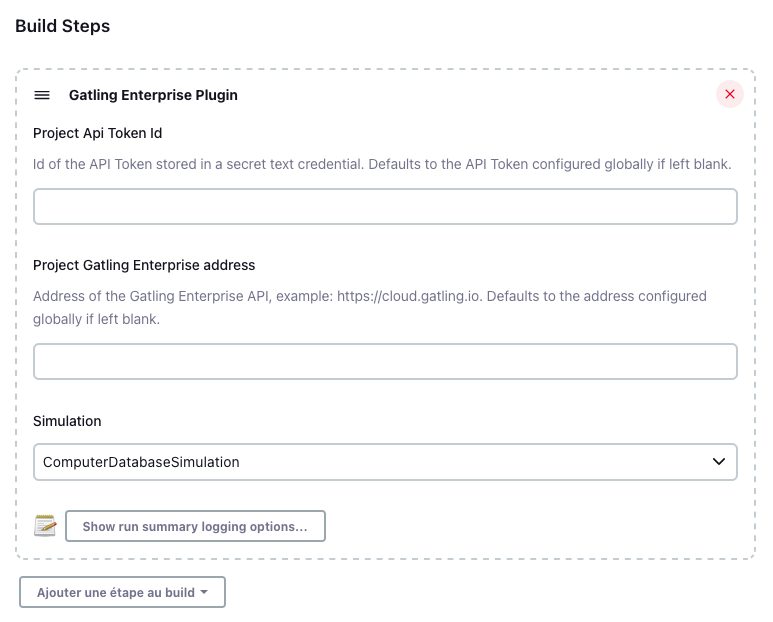
Add a new build step called Gatling Enterprise Edition Plugin.
If you don’t want to use the globally configured API token, you can chose another one stored in a Jenkins secret text credential. Choose one of the simulations in the drop-down menu.
This step regularly prints a summary of the run’s current status to the build logs. By default, the summary is printed every 5 seconds the first 12 times (i.e. for the first 60 seconds), and then every 60 seconds. You can configure this behavior (or disable it completely) by clicking on the Show run summary logging options button.
Displaying assertions as JUnit
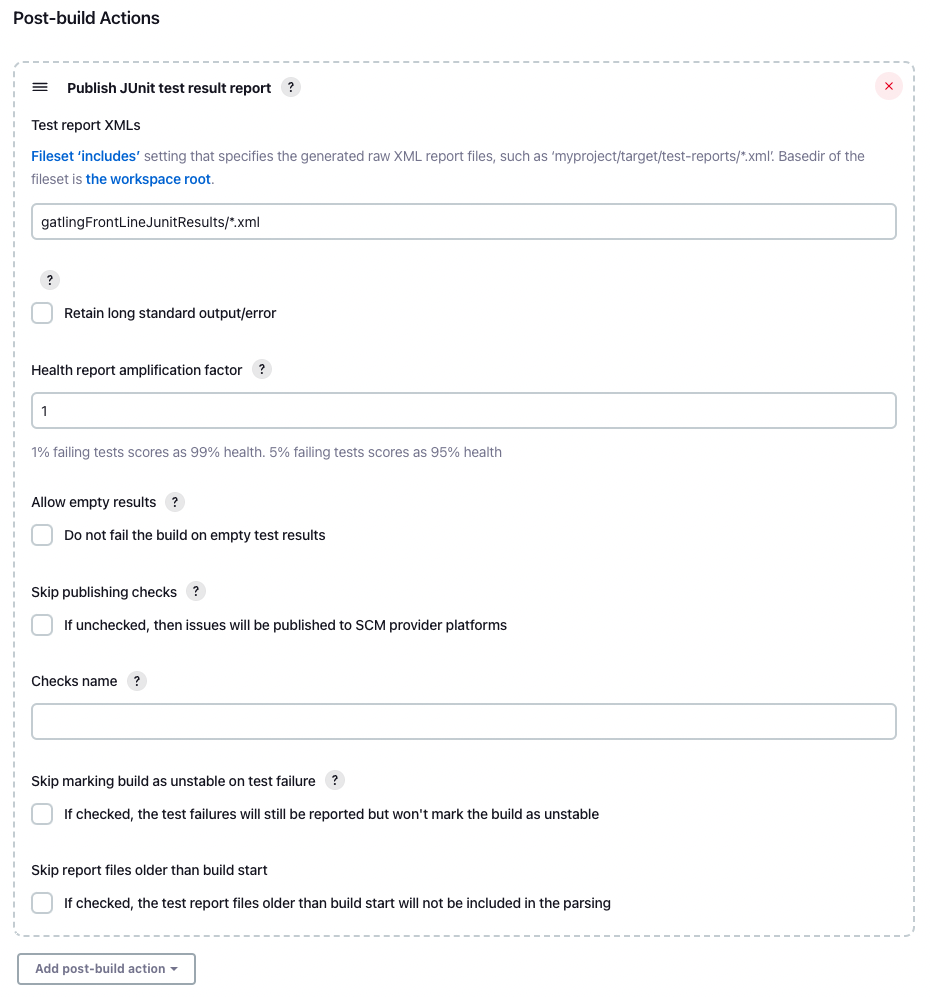
You can display the results of the Gatling Enterprise Edition assertions with the JUnit plugin.
Add a new build step called Publish JUnit test result report and fill the Test report XMLs input with the following line:
gatlingFrontLineJunitResults/*.xml
Usage
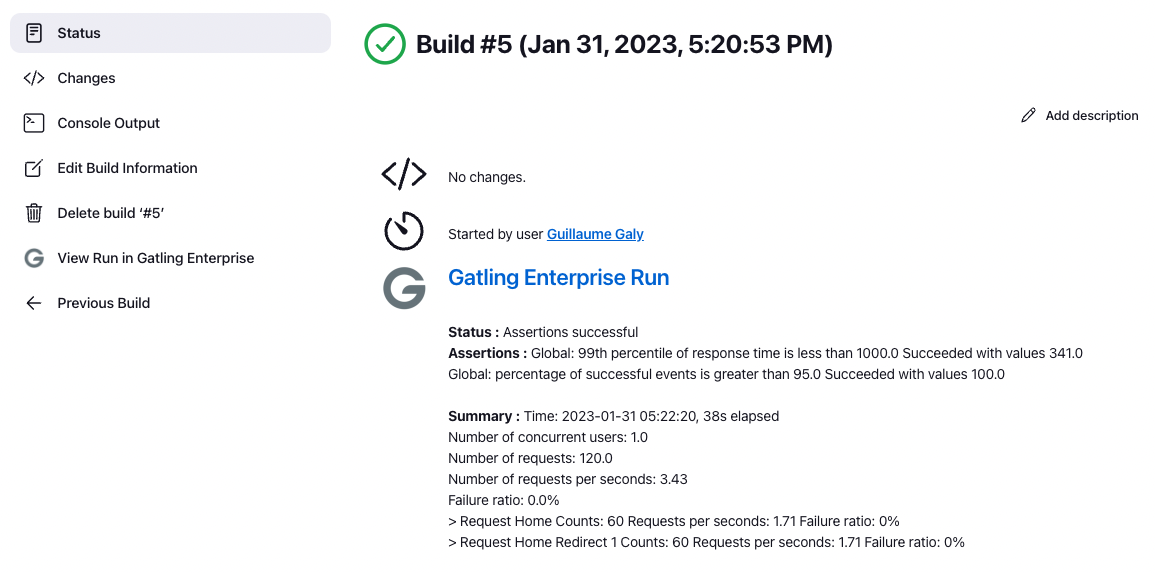
A new Gatling Enterprise simulation will be started every time the job is run. Check the Console Output to see the simulation progress. If the simulation ran successfully, it will look like the following:
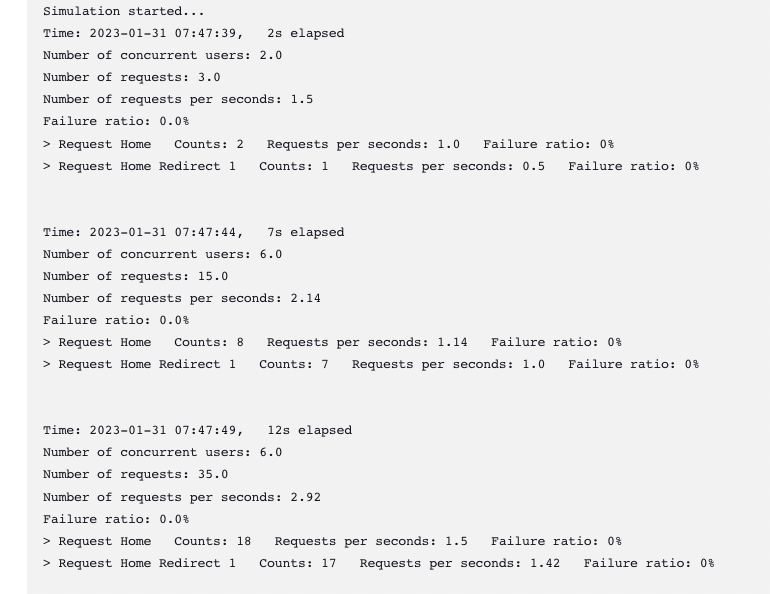
Live metrics will be displayed in the console, and in the Status page. The link View Run in Gatling Enterprise Edition in the build page menu links to Gatling Enterprise Edition.